| How to Upgrade |
| 2. Run NoMachine Server Inside Docker |
Given that Docker is already installed on the host machine, to run NoMachine server inside Docker it's enough to build an image from the Dockerfile and launch it.
For example to build an image with MATE as desktop environment:
Step 1 - Create your image directory, e.g. :
Step 2 - Copy content of the Dockerfile below to: nomachine/Dockerfile.
Adapt the Dockerfile to your needs.
Step 3 - Copy content of the wrapper script below to: nomachine/nxserver.sh. Then set executable permissions:
| chmod +x nomachine/nxserver.sh |
Step 4 - Build the image:
| docker build -t=nomachine nomachine |
Step 5 - Run the container:
| docker run -d -p 4000:4000 nomachine |
Set a different port if necessary (see points d and e below).
You can specify multiple ports by reiterating the -p option, e.g.
| docker run -d -p 4000:4000 -p 22:22 nomachine |
The Dockerfile is a script which contains a set of instructions used to build the container image.
See also the official Docker documentation https://docs.docker.com/engine/reference/builder/
The Dockerfile below uses the NoMachine package downloaded from the NoMachine website as an example. It can be easily adapted to your environment:
a) By default this Docker file will run a MATE desktop environment, you can adjust it by replacing mate-desktop-environment-core with the desktop of your choice.
b) It will create the nomachine user with 'nomachine' as a password, you can specify a different username and password and repeat instructions for creating additional users.
c) Note that there is no need to expose ports in Dockerfile, this can be done by using the -p option when running the 'docker run' command. E.g.
| docker run -d -p 4000:4000 nomachine |
e) Connections by the web use port 4080 and 4443 by default. Run:
| docker run -d -p 4000:4000 -p 22:22 -p 4443:4443 nomachine |
to let users run web sessions. This applies to NoMachine servers supporting sessions by the web only.
Docker file
# Dockerfile to install NoMachine free v. 7 with MATE interface
FROM debian:buster
ENV DEBIAN_FRONTEND=noninteractive
RUN apt-get update && apt-get install -y apt-utils vim xterm cups curl
ENV USER nomachine
ENV PASSWORD nomachine
RUN apt-get install -y mate-desktop-environment-core
# Installation of ssh is required if you want to connect to NoMachine server using SSH protocol when supported.
# Comment it out if you don't need it or if you use NoMachine free.
RUN apt-get install -y ssh \
&& service ssh start
ENV DBUS_SYSTEM_BUS_ADDRESS=unix:path=/host/run/dbus/system_bus_socket
RUN apt-get install -y pulseaudio \
&& mkdir -p /var/run/dbus
RUN curl -fSL "https://www.nomachine.com/free/linux/64/deb" -o nomachine.deb \
&& dpkg -i nomachine.deb \
&& groupadd -r ${USER} -g 433 \
&& useradd -u 431 -r -g ${USER} -d /home/${USER} -s /bin/bash ${USER} \
&& mkdir /home/${USER} \
&& chown -R ${USER}:${USER} /home/${USER} \
&& echo "${USER}:${PASSWORD}" | chpasswd
ADD nxserver.sh /
ENTRYPOINT ["/nxserver.sh"]
RUN /etc/init.d/dbus start |
The nxserver.sh wrapper script
#!/bin/sh
/etc/NX/nxserver --startup
tail -f /usr/NX/var/log/nxserver.log |
Troubleshooting
On some systems, e.g. Ubuntu 14.04 , AppArmor blocks many operations.
If the system logs report a message similar to:
apparmor="DENIED" operation="ptrace" profile="docker-default" pid=3004 comm="nxexec" requested_mask="read" denied_mask="read" peer="docker-default"
it's necessary to reconfigure AppArmor to let NoMachine access /proc filesystem. To do this you may install the AppArmor Utilities if you don't have them already:
| # sudo apt-get install apparmor-utils |
| and run: |
| # sudo aa-complain /etc/apparmor.d/docker |
If you get an error like the following while executing 'sudo aa-complain /etc/apparmor.d/docker':
apparmor.common.AppArmorException: 'Syntax Error: Invalid Regex @{PROC}/{*,**^[0-9*],sys/kernel/shm*} in file: /etc/apparmor.d/docker line: 16'
comment out the corresponding line (in this case line 16) in the /etc/apparmor.d/docker file.
Then execute once again this command:
| sudo aa-complain /etc/apparmor.d/docker |
Finally restart the container, NOT the docker service.
On Ubuntu 16.04, besides following the above instructions, it's also necessary to enable PTRACE capabilities required by NoMachine. Since PTRACE is not provided by the default docker AppArmor profile, add the --cap-add=SYS_PTRACE parameter to the docker command line, e.g.:
| docker run -d -p 4000:4000 --cap-add=SYS_PTRACE nomachine |
This point applies also to Mac.
| 3. Run a Dockerized Application in a NoMachine Custom Session |
|
This use case provides some example to illustrate how to set-up a browser, office suite, VOIP program and e-mail client in a Docker and run it as single application in a NoMachine custom session.
Note: the NoMachine product installed on the remote Linux server host must support the Linux virtual desktop functionality, e.g., Workstation, Terminal Server.
The following instructions have been tested in this environment:
- Hosting system: Ubuntu 18.04
- Docker version: 19.03.6
- NoMachine Workstation version: 7.0.211
How to run a NoMachine custom session
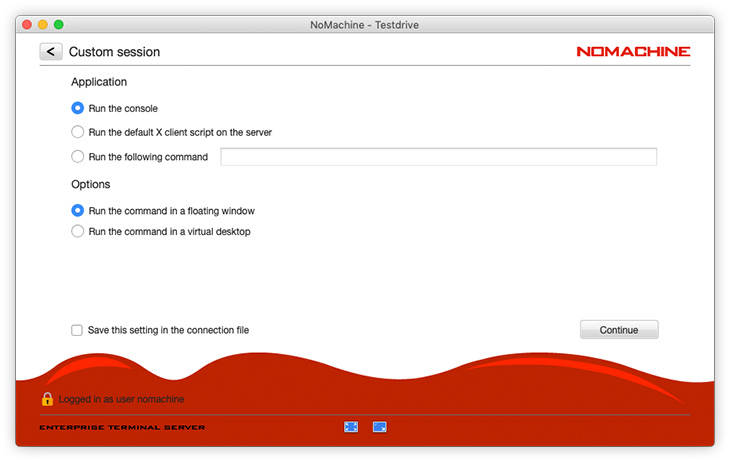
Connect by NoMachine to the Linux server host where you have installed a NoMachine product with support for the virtual Linux desktop functionality. In this example, Workstation has been installed. In the NoMachine client UI click on 'Create a new desktop or custom session'. Then click on 'Create a new custom session'.
In the 'Custom session' panel of the UI select the 'Run the following command' option and specify there the proper command to run the dockerized application on the Linux host. Examples in the next paragraphs provide also the command to be specified in this UI field.
Pre-requisites to run a dockerized application in a NoMachine custom session
- The remote host is Linux.
- Docker is installed on the host machine.
- A NoMachine server, e.g. NoMachine Workstation, is installed on the same host, but not in the Docker container.
- Instructions to set-up a dockerized application have to be executed in a terminal as normal user.
| 3.1. Set-up and Run a Dockerized Browser in a NoMachine Custom Session |
Step 1 - Get the browser-box Docker image.
Download the browser-box project at https://github.com/sameersbn/docker-browser-box by executing this command in a terminal::
| git clone https://github.com/sameersbn/docker-browser-box |
Step 2 - Change directory to docker-browser-box and apply some manual configurations:
Modify the following line in the entrypoint.sh file:
exec sudo -HEu ${BROWSER_BOX_USER} PULSE_SERVER=/run/pulse/native $@ ${extra_opts}
to have:
exec sudo -HEu ${BROWSER_BOX_USER} PULSE_SERVER=/run/pulse $@ ${extra_opts}
In the scripts/browser-box script, substitute the following line:
VOLUMES+=" --volume=${XAUTH}:${XAUTH}"
with:
VOLUMES+=" --volume=$HOME/.Xauthority:${XAUTH}"
Remove the following line:
VOLUMES+=" --volume=/run/user/${USER_UID}/pulse:/run/pulse"
and add this line in place of the line above you have just removed:
VOLUMES+=" --volume=${PULSE_SERVER}:/run/pulse"
Substitute the following line:
${SUDO} docker run -d \
with:
${SUDO} docker run -d --net=host \
and:
${BROWSER_BOX_REPO}/browser-box:1.0.1-3 ${prog} $@ >/dev/null
with:
${BROWSER_BOX_REPO}/browser-box ${prog} $@ >/dev/null
Step 3 - Build the image:
| docker build -t sameersbn/browser-box . |
Step 4 - Install scripts necessary to launch the browser
The following command will install the necessary scripts in the /usr/local/bin directory. Scripts will launch any of the following browsers: chromium-browser, firefox, google-chrome, google-chrome-stable, tor-browser:
docker run -it --rm \
--volume /usr/local/bin:/target \
--env BROWSER_BOX_REPO=sameersbn \
sameersbn/browser-box install |
Step 5 - Launch any of the available browsers
Browser can be launched by command line by using the 'browser-box ' command. For example, to launch google-chrome type the following command:
| browser-box google-chrome |
| 3.2. Set-up and Run Dockerized LibreOffice in a NoMachine Custom Session |
Step 1- Get the LibreOffice Docker image.
Command below pulls down the LibreOffice docker image if it is not already available and runs it:
| docker run -d -v $HOME/Documents:/home/libreoffice/Documents:rw -v /tmp/.X11-unix:/tmp/.X11-unix:rw -e uid=$(id -u) -e gid=$(id -g) -e DISPLAY=unix$DISPLAY -v $HOME/.Xauthority:/home/libreoffice/.Xauthority --net=host chrisdaish/libreoffice |
The same command can be also specified in the "Run the following command" field of the NoMachine UI to run LibreOffice in a NoMachine custom session. However it's more convenient to create a wrapper script like the following. Let's call it, for example, libreoffice.sh. Create the libreoffice.sh file with this content:
| #!/bin/bash
docker run -d -v $HOME/Documents:/home/libreoffice/Documents:rw -v /tmp/.X11-unix:/tmp/.X11-unix:rw -e uid=$(id -u) -e gid=$(id -g) -e DISPLAY=unix$DISPLAY -v $HOME/.Xauthority:/home/libreoffice/.Xauthority --net=host chrisdaish/libreoffice |
and give permissions to execute it by running from a terminal:
| $ chmod +x libreoffice.sh |
To run LibreOffice as a single application with NoMachine, specify this command in the "Run the following command" field of the GUI:
/path/to/your/home/libreoffice.sh
| TIP |
 |
|
|
|
| Terminating a custom session doesn't terminate a docker container. To terminate it you may use the docker kill <container ID> command. |
| 3.3. Set-up and Run Dockerized Skype in a NoMachine Custom Session |
Step 1 - Get the Skype Docker image
Command below pulls down the Skype Docker image if it is not already available and runs it:
| docker run -d -v /tmp/.X11-unix:/tmp/.X11-unix:ro -v $HOME/.Xauthority:/tmp/auth -e XAUTHORITY=/tmp/auth -v /dev/snd:/dev/snd --privileged -e DISPLAY="unix$DISPLAY" --net=host tianon/skype |
The same command can be also specified in the "Run the following command" field of the NoMachine UI to run Skype in a NoMachine custom session. However it's more convenient to create a wrapper script like the following. Let's call it skype.sh. Create the skype.sh file with this content:
| #!/bin/bash
docker run -d -v /tmp/.X11-unix:/tmp/.X11-unix:ro -v $HOME/.Xauthority:/tmp/auth -e XAUTHORITY=/tmp/auth -v /dev/snd:/dev/snd --privileged -e DISPLAY="unix$DISPLAY" --net=host tianon/skype |
and give permissions to execute it by running from a terminal:
To run Skype as a single application with NoMachine, specify this command in the "Run the following command" field of the GUI:
/path/to/your/home/skype.sh
| TIP |
|
|
|
|
| Terminating a custom session doesn't terminate a docker container. To terminate it you may use the docker kill <container ID> command. |
| 3.4. Set-up and run dockerized Thunderbird in a NoMachine custom session |
Step 1 - Get the Thunderbird Docker image
Command below pulls down the Thunderbird Docker image if it is not already available and runs it:
| docker run -d -e DISPLAY=unix$DISPLAY -v /tmp/.X11-unix:/tmp/.X11-unix -v $HOME/.Xauthority:/home/docker/.Xauthority:rw -u docker --net=host yantis/thunderbird thunderbird |
The same command can be also specified in the "Run the following command" field of the NoMachine UI to run Thunderbird in a NoMachine custom session. However it's more convenient to create a wrapper script like the following. Let's call it thunderbird.sh. Create the thunderbird.sh file with this content:
| #!/bin/bash
docker run -d -e DISPLAY=unix$DISPLAY -v /tmp/.X11-unix:/tmp/.X11-unix -v $HOME/.Xauthority:/home/docker/.Xauthority:rw -u docker --net=host yantis/thunderbird thunderbird |
and give permissions to execute it by running from a terminal:
| $ chmod +x thunderbird.sh |
To run Thunderbird as a single application with NoMachine, specify this command in the "Run the following command" field of the GUI:
/path/to/your/home/thunderbird.sh
| TIP |
|
|
|
|
| Terminating a custom session doesn't terminate a docker container. To terminate it you may use the docker kill <container ID> command. |
|


