|
|
Welcome to the NoMachine Enterprise Client - Installation and Configuration Guide v. 6.
What is NoMachine Enterprise Client for?
NoMachine Enterprise Client is a software designed to let you connect to a remote computer where any of the NoMachine server products, included NoMachine free, is installed. For example let's say there is an Enterprise Desktop running on the remote computer, you can connect from the Enterprise Client on your machine to the remote physical desktop:

As an alternative to install NoMachine Enterprise Client, you can use your browser to connect to the remote computer: this works with any server product, except NoMachine free.
Client packages are available for Windows, Mac, Linux and also for Android and iOS mobile devices. The native client UI for Android and iOS is actually designed for tablets with a 7 inch display or larger. Download from the Play Store or the Apple Store is therefore not possible if your device has a smaller screen size. For Android devices, however, it is possible to download the client package from the NoMachine web site at https://www.nomachine.com/download. Even if the UI is not optimized for smaller displays, it's known to work reasonable well also on such devices. This can be considered a short term solution. NoMachine will be soon release a native client version for Android and iOS smartphones that will be made available in their respective online stores.
A Graphical Interface
The client is equipped with a native graphical User Interface (GUI) providing a number of functionalities that we can group into the following:
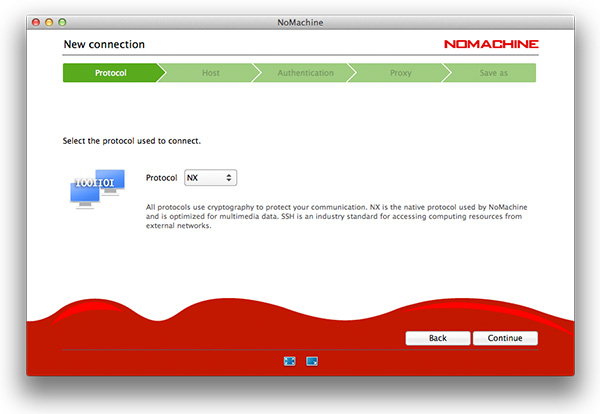
1) A wizard to guide through the creation of a new connection:
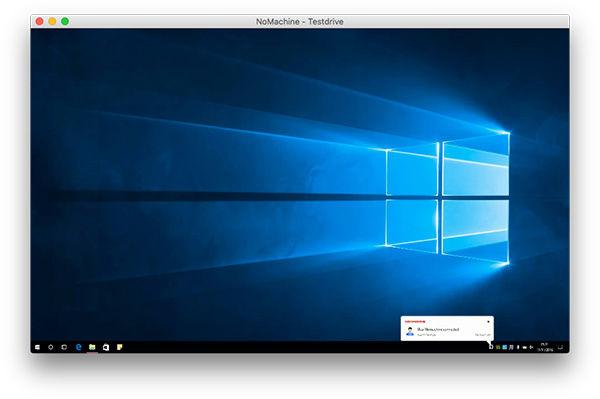
2) Displaying of the remote desktop:
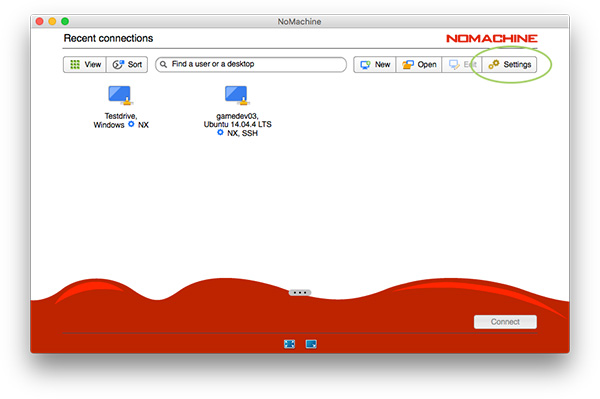
3) Easy access to recent connections and Settings:
4) Preferences to personalize aspect and behavior of the client (via Settings):

| TIP |
 |
|
|
|
| All NoMachine server types (included NoMachine free) provide the client UI and can work as a client to connect to a remote machine hosting a NoMachine server. In case of servers, it's possible to switch between 'player' and 'server' preferences to access the corresponding GUIs for managing their settings. |
This guide is organized in different sections which deal with client's installation, configuration and administration (advanced).
Online Resources
Visit the NoMachine Support Area to access a variety of online resources included the NoMachine Forums, tutorials and FAQs: https://www.nomachine.com/support
Find a list of all documents and tutorials: https://www.nomachine.com/all-documents
Use the Knowledge Base search engine to access articles, FAQs and self-help information: https://kb.nomachine.com
Leave Feedback About This Guide
Our goal is to provide comprehensive and clear documentation for all NoMachine products. If you would like to send us your comments and suggestions, you can use the contact tool available at https://www.nomachine.com/contact-request, selecting Web Quality Feedback as your option.
Supported Operating Systems
Windows 32-bit/64-bit XP/Vista/7/8/8.1/10
Windows Server 2008/2012/2016
Mac OS X Intel 64-bit 10.7 to 10.14
Linux 32-bit and 64-bit
RHEL 4 to RHEL 8
SLED 10 to SLED 15
SLES 10 to SLES 15
openSUSE 10.x to openSUSE 15.x
Mandriva 2009 to Mandriva 2011
Fedora 10 to Fedora 30
Debian 4.0 to Debian 9
Ubuntu 8.04 to Ubuntu 19.04
Raspberry Pi 2/3 ARMv6/ARMv7/ARMv8
Hardware requirements
Intel Core2 Duo or AMD Athlon Dual-Core or equivalent
1 GB RAM
Network connection (either a LAN, or Internet link: broadband, cable, DSL, etc...)
Size required on disk:
Windows 85 MB
Linux 80 MB
Mac 80 MB
ARMv6 70 MB
ARMv7 60 MB
ARMv8 78 MB
Software requirements
NoMachine Enterprise Client v. 6 is compatible with server versions 5 or 4 while it's no longer compatible with the legacy NX 3.5.0 servers.
INSTALL
Download the NoMachine Enterprise Client EXE package from the NoMachine web site and double click on the package icon: the Setup wizard will take you through the installation.
| TIP |
|
|
|
|
| To install the package in silent or very silent mode from a CMD console, run respectively: |
| >nomachine-packageName_packageVersion.exe /silent |
| or: |
| >nomachine-packageName_packageVersion.exe /verysilent |
|
| To specify a non-default installation directory, use: |
| >nomachine-packageName_packageVersion.exe /SILENT /DIR="X:Target_directory" |
| or: |
| >nomachine-packageName_packageVersion.exe /VERYSILENT /DIR="X:Target_directory" |
|
UPDATE
There are two ways to update your current installation:
| I |
Automatic updates
You can update your installation from our repositories. Just run the NoMachine UI from your Programs Menu and access the Settings -> Updates panel. Then click on the 'Check now' button.
NoMachine Enterprise Client has the automatic check for updates enabled: it will check by default our repositories every two days to verify if updates are available. In this case, the server will prompt a dialog informing that a new version is available but it will never automatically update the current installation.
Checking for updates can be disabled from that dialog by selecting the 'Don't ask again for this version' option or in the Updates panel by unchecking the 'Automatically check for updates' option.
Detailed instructions for configuring the Automatic Updates are available in a separate document in the Configuration section at: https://www.nomachine.com/all-documents .
|
| II |
Update with NoMachine packages
Alternatively, download the latest available package from the NoMachine web site and click on the executable file to launch Setup. As for the installation, Setup will guide you through all steps necessary for updating your installation.
|
UNINSTALL
On Windows 10 and 8: open the Start menu and look for the NoMachine Enterprise Client application. Right mouse click on it and choose 'Uninstall'.
You can also use the Search box from the Charms bar on the right side of the screen and type 'Control Panel' to open it. Then access the Programs - Uninstall a program panel.
On Windows 7 and Vista: click on the Start button and click to open the Control panel from the Start menu. Then access panel 'Programs and Features' and choose to uninstall NoMachine Enterprise Client.
On Windows XP: Click on the Start button and click to open the Control panel from the Start menu. Then access panel 'Add or Remove Programs' and choose to uninstall NoMachine Enterprise Client.
| TIP |
|
|
|
|
| To uninstall from a CMD console, move to C:/ProgramData/NoMachine/var/uninstall/ (if you are on Vista/7/8/10) or to C:/Documents and Settings/All Users/NoMachine/var/uninstall/ (if you are on XP). Then run: |
| > unins000.exe /silent |
| or: |
| > unins000.exe /verysilent |
|
| Uninstalling is completed when your command prompt is back. |
|
INSTALL
Download the NoMachine Enterprise Client DMG package from the NoMachine web site and double click on the package icon to mount the disk image. Next double-click on the package to install it; the Installer will take you through the installation.
| TIP |
|
|
|
|
| To install from the command line, run: |
| $ NXMOUNTDIR=$(echo `hdiutil mount nomachine-packageName_packageVersion.dmg | tail -1 | awk '{$1=$2=""; print $0}'` | xargs -0 echo) |
| $ sudo installer -pkg "${NXMOUNTDIR}/NoMachine.pkg" -target / |
|
UPDATE
There are two ways to update your current installation:
| I |
Automatic updates
You can update your installation from our repositories. Just run the NoMachine UI from your Programs Menu and access the 'Settings' -> 'Updates' panel. Then click on the 'Check now' button.
NoMachine Enterprise Client has the automatic check for updates enabled: it will check by default our repositories every two days to verify if updates are available. In this case, the server will prompt a dialog informing that a new version is available but it will never automatically update the current installation.
Checking for updates can be disabled from that dialog by selecting the 'Don't ask again for this version' option or in the Updates panel by unchecking the 'Automatically check for updates' option.
Detailed instructions for configuring the Automatic Updates are available in a separate document in the Configuration section at: https://www.nomachine.com/all-documents .
|
| II |
Update with NoMachine packages
Alternatively, download the latest available package from the NoMachine web site and click on the executable file to launch Setup. As for the installation, Setup will guide you through all steps necessary for updating your installation.
|
UNINSTALL
To uninstall the Enterprise Client, drag and drop NoMachine from Applications to trash or select 'Move to trash' from the mouse button menu. This will uninstall all the NoMachine software.
| TIP |
|
|
|
|
| To uninstall from command line, it's enough you remove the NoMachine application directory: |
| $ sudo rm -rf /Applications/NoMachine.app |
|
Installing for the first time
You can install, update and uninstall using the graphical package manager of your Linux distribution or from command line by running commands from an xterm or similar with the sudo utility, or as root user if you don't have sudo installed. Instructions below refer to installation by command line.
There are two ways to update your current installation:
| I |
Automatic updates
You can update your installation from our repositories. Just run the NoMachine UI from your Programs Menu and access the 'Settings' panel, go to the 'Updates' UI and click on the 'Check now' button.
NoMachine Enterprise Client has the automatic check for updates enabled: it will check by default our repositories every two days to verify if updates are available. In this case, it will prompt a dialog informing that a new version is available but it will never automatically update the current installation.
Checking for updates can be disabled from that dialog by selecting the 'Don't ask again for this version' option or in the Updates panel by unchecking the 'Automatically check for updates' option.
Detailed instructions for configuring the Automatic Updates are available in a separate document in the Configuration section at: https://www.nomachine.com/all-documents .
|
| II |
Update with NoMachine packages
Alternatively, download the latest available package from the NoMachine web site and click on the executable file to launch Setup. As for the installation, Setup will guide you through all steps necessary for updating your installation.
|
If you want to install to default location, namely /usr/NX/:
INSTALL
| # rpm -ivh <pkgName>_<pkgVersion>_<arch>.rpm |
| To find out which NoMachine package you have installed (you will get the full name of the package), run: |
| # rpm -qa | grep nomachine |
UPDATE
| # rpm -Uvh <pkgName>_<pkgVersion>_<arch>.rpm |
UNINSTALL
| # rpm -e nomachine-enterprise-client |
| TIP |
|
|
|
|
| For non-default locations, for example /opt/NX: |
|
INSTALL
# rpm -ivh <pkgName>_<pkgVersion>_<arch>.rpm --prefix /opt
UPDATE
# rpm -Uvh <pkgName>_<pkgVersion>_<arch>.rpm --prefix /opt
UNINSTALL
# rpm -e nomachine-enterprise-client
|
|
If you want to install to default location, namely /usr/NX/:
INSTALL
| $ sudo dpkg -i <pkgName>_<pkgVersion>_<arch>.deb |
| To find out which NoMachine package you have installed (you will get the full name of the package), run: |
| $ dpkg -l | grep nomachine |
UPDATE
| $ sudo dpkg -i <pkgName>_<pkgVersion>_<arch>.deb |
UNINSTALL
| $ sudo dpkg -r nomachine-enterprise-client |
| TIP |
|
|
|
|
| For non-default locations, for example /opt/NX: |
|
INSTALL
$ sudo NX_INSTALL_PREFIX=/opt dpkg -i <pkgName>_<pkgVersion>_<arch>.deb
UPDATE
$ sudo NX_INSTALL_PREFIX=/opt dpkg -i <pkgName>_<pkgVersion>_<arch>.deb
UNINSTALL
$ sudo dpkg -r nomachine-enterprise-client
|
|
If you want to install to default location, namely /usr/NX/, ensure that package is placed there.
INSTALL
| $ cd /usr |
| $ sudo tar xvzf <pkgName>_<pkgVersion>_<arch>.tar.gz |
| $ sudo /usr/NX/nxclient --install |
UPDATE
| $ cd /usr |
| $ sudo tar xvzf <pkgName>_<pkgVersion>_<arch>.tar.gz |
| $ sudo /usr/NX/nxclient --update |
UNINSTALL
| $ sudo /usr/NX/scripts/setup/nxclient --uninstall |
| $ sudo rm -rf /usr/NX |
| TIP |
|
|
|
|
| For non-default locations, for example /opt/NX: |
|
INSTALL
$ sudo NX_INSTALL_PREFIX=/opt /usr/NX/nxclient --install
UPDATE
$ sudo NX_INSTALL_PREFIX=/opt /usr/NX/nxclient --update
UNINSTALL
$ sudo /opt/NX/scripts/setup/nxclient --uninstall
$ sudo rm -rf /opt/NX
|
|
Launch the NoMachine Enterprise Client program, then click on the 'Settings' button in the UI to access client's 'Preferences' (Player preferences):
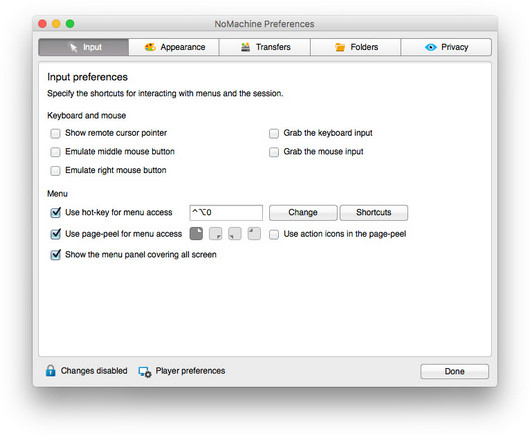
You will see that the Settings panel is made of different tabs where you can:
| I |
Set preferences for input devices and keyboard shortcuts (Input). |
| II |
Customize UI appearance and language (Appearance). |
| III |
Set preferences for transferring files from/to remote (Transfers). |
| IV |
Modify store directories for NoMachine files, included connection files (Folders). |
| V |
Manage configurations for privacy, e.g. keep log files (Privacy). |
| VI |
Automatically update the installation from NoMachine repositories and find out which is the version of your client (Updates). |
To connect the first time to the remote computer, or to create a new connection, click on 'New'.
A Wizard will guide you through the necessary steps to set-up the connection. Most of the time you can leave default settings as they are and just specify hostname or IP of the remote computer and the name of your connection.
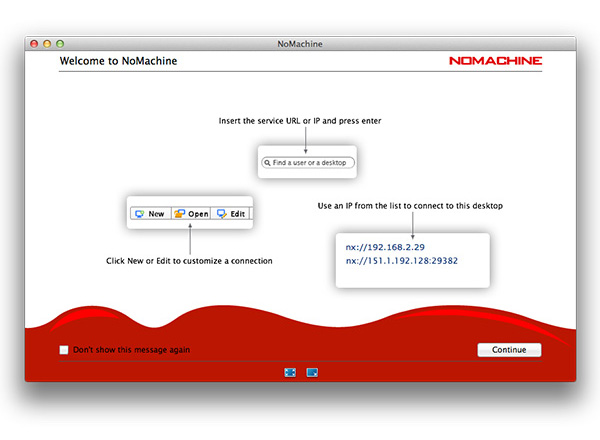
If you are connecting in a local network, provide the internal IP of the remote host. If you connect over the internet, use the public IP of the remote host and the assigned port. These data can be retrieved on the remote host by opening the NoMachine UI on the remote host:
For a more advanced configuration, the client wizard permits to define:
1) Protocol to be used (NX by default or SSH if the remote server supports it).
2) Host name or IP of the remote computer and listen port for the NX/SSH connection.
3) Authentication method (e.g. password-based authentication, the default).
4) The possibility to use an HTTP or a SOCKS proxy.
5) Connection name.
Connection settings can be edited at any moment: click on the connection icon in the UI to open the context menu and select 'Edit connection'.
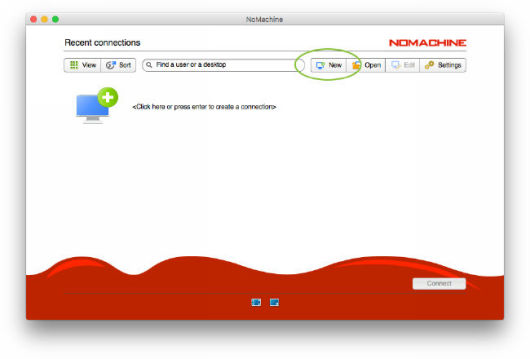
Once the connection is created, it will be listed in the first opening panel of the client, 'Recent connections':
To connect to the remote computer, double-click on the connection icon.
Right-click on the icon, instead, opens a menu where you can choose to:
- Start the connection.
- Edit the connection and modify its settings.
- Rename the connection.
- Remove the connection from the 'Recent connections' list and permanently delete it.
| TIP |
|
|
|
|
| Connection files are .nxs files, not intended to be edited manually. They are stored in the directory defined by 'Connections and recordings' in the Settings -> Folders panel in the UI. For example on Windows, C:\Users\nxtest01\Documents\NoMachine and on Mac, /Users/nxtest02/Documents/NoMachine. |
Pre-requisite are that any of the NoMachine server products is installed on the remote computer and that you have a system account there.
You will have to use its credentials to log-in to the remote host when requested. Insert them in the 'Username' and 'Password' fields when shown in the client GUI.
| TIP |
|
|
|
|
| Save log-in credentials to not be prompted again to insert them the next time you connect again. If doing that it's not possible, it means that your administrator has configured the server to prevent users from storing credentials. |
A particular log-in case is 'Login using a guest account': the server will automatically generate a system account (guest user) for you and you don't need to know your access credentials. This is available only when the NoMachine server supports this feature and the administrator has configured the server to provide it.
Once logged-in, if you connect to a NoMachine (free) server or to the Enterprise Desktop, you will be immediately connected to the physical desktop of the remote machine. When you are connected to the physical desktop, it's like if you are sitting in front of the remote computer.
If the login screen is active, you will be able to enter with any of the system accounts enabled for that. If the remote screen is locked, you will have to unlock it by providing the password of the logged user.
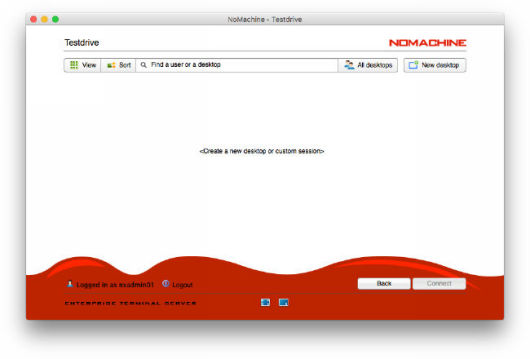
If you are connecting to any of the NoMachine terminal servers on Linux instead, you will be able to choose between creating a virtual desktop or a custom session. Click on 'Create a new desktop or custom session' and choose among the available options:
| TIP |
|
|
|
|
| Save your choice by selecting 'Save this settings in the connection file' wherever this flag is available, it's at the bottom right of the client window . The session type you decided to start will be re-used the next time you run this connection and you will skip steps to select it. |
A virtual desktop is an individual instance of the remote desktop: it's your personal desktop.
Many users can have each one his/her own virtual desktop on the same remote host as you. That's why when you connect you can see also their sessions listed in the client GUI. Click on the 'My desktop'/'All desktops' button to switch view list and show only your own virtual desktops or also those of other users. This last view mode is useful if you need to connect to the desktop of someone else to make collaborative work (session collaboration or desktop sharing). Virtual desktops can be shared in interactive or view-only mode.
When you close the virtual session or application (i.e. you disconnect but don't terminate it), you will find it listed once you log-in the next time. Instead of choosing 'Create a new desktop' you can click on any of your virtual desktops to reconnect it.
A custom session permits to run a single Linux application instead than the full desktop. To do that, provide command to launch it with the 'Run the command in a floating window' option enabled:
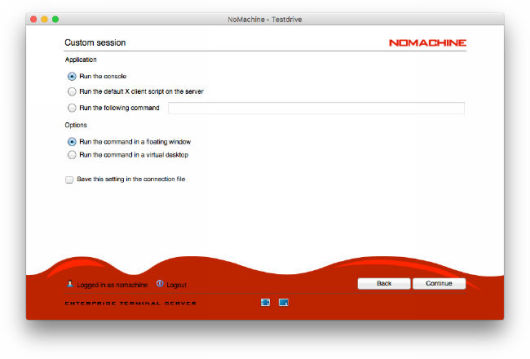
The Application area permits to define which remote application will be run:
Run the console will launch a system terminal.
Run the default X client script on the server will execute the X client script set on the remote host.
Run the following command permits to specify the application to be launched. If such application is not in the path on the remote host, it's necessary to provide the full path in the UI field.
For example if 'firefox' is in the path, it's enough to write in the command field: firefox. If it's not in the path, it's necessary to specify the full path such as: /usr/bin/firefox. If the application supports options, they can be specified in the command as well. E.g. to open a URL in a new tab: /usr/bin/firefox -new-window http://www.nomachine.com/
In the Options area you can define if the application has to be run as single application or embedded in the NoMachine client window by selecting respectively: Run the command in a floating window or Run the command in a virtual desktop.
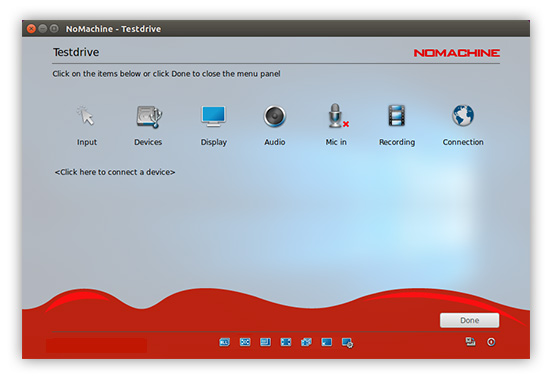
Once the session is started, you will be welcomed by a series of tutorial panels to explain which are the NoMachine tools at your disposal to manage the session. They show, in the following order:
How to open the NoMachine menu panel inside the session and the icon buttons at the bottom of the window to manage the screen visualization (also called 'Quick Access Display Icons') and all options of the menu panel (e.g. set input preferences, connect devices etc ...)
Next panels allow to perform some preliminary settings:
Choose how to display the menu panel (to cover the screen or to be run as a separate window) and
Make the server resolution to adapt to client resolution (default) or treat them separately.
Finally, if connected to the physical desktop, it will be also possible to:
Mute audio of the remote server when connected to its physical desktop (default) or not.
After completing all the introductory steps, you are in!
| TIP |
|
|
|
|
| Select 'Don't show this message again' at the bottom right of the client window to skip tutorials the next time you run this session. |
Let's distinguish between when you are connected to the physical desktop of the remote machine and when you are running a virtual desktop or a custom session.
Closing physical desktop sessions
You can close the connection to the remote physical desktop by clicking on the X in the upper right corner of the client window or open the NoMachine menu (ctrl+alt+0), enter the 'Connection' panel and click on 'Disconnect'.
The default shortcut to close it is: Ctrl+Alt+T.
You can reconnect to the physical desktop at any time, by launching your connection again.
Closing virtual desktops and custom sessions
To close a virtual desktop and be able to reconnect it later, simply close the client window by clicking on the X button in the upper right corner. Otherwise, open the NoMachine menu (ctrl+alt+0), enter the 'Connection' panel and click on 'Disconnect'. You will be able to reconnect your session later, even from a different computer (we call it 'session migration'). If you left an application running inside the session (e.g. a graphics program rendering images), you will find it still running once reconnected.
If you need instead to terminate the virtual desktop, simply log-out from the system.
To disconnect a custom session, close the client window showing the NoMachine menu (not the window of the custom application!)
For teminating it, close the application window.
| TIP |
|
|
|
|
| If you use a program to elaborate data, disconnect the NoMachine virtual session and let the program continue its operations. |
This chapter provides an overview of which are tools at your disposal to configure the session behavior and use the available NoMachine services. More specific guides dealing with some functionalities in detail are available in the 'Tutorials' section here: https://www.nomachine.com/all-documents
To open the NoMachine menu panel inside the session, enter the key combination Ctrl+Alt+0 or move your cursor to the page-peel in the top right-hand corner of the window:
The menu panel looks like:
By default you have access to the remote desktop (either physical or virtual) in interactive mode, and you can use applications, access files and directories exactly as if you are sit in front of the remote computer.
The NoMachine menu panel is like a console providing some facilities you can use while running the session, like:
1) Emulate the middle mouse button if your mouse has three buttons or a clickable scroll wheel.
2) Define shortcuts for quickly terminate the session, toggle to fullscreen, minimize the client window and more.
3) Connect disks, printers, USB devices and more from local to remote and vice-versa.
4) Tune at runtime display settings like quality of images and screen resolution.
5) Mute audio and microphone or tune volume.
6) Record a video of the session or of your local desktop and play it.
7) Retrieve statistics of the data traffic generated by the NoMachine session.
To open the Monitor menu, right mouse click on the !M icon the system tray of the remote desktop:
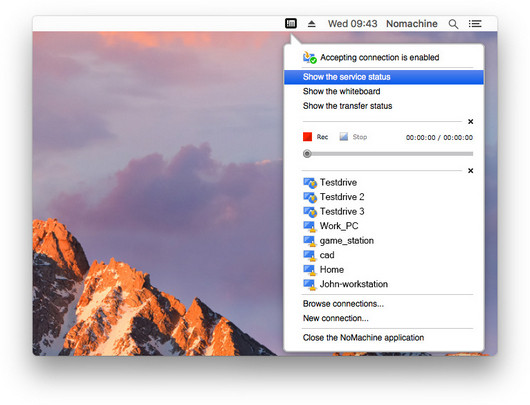
This menu gives quick access to some facilities like:
1) Accepting connections (this allows the user to enable/disable the sharing of its desktop).
2) Show the recording bar (to register a video of your remote desktop).
3) Send a file from the client and Download a file from the server.
and others.
Other options like Showing the service status are deserved to the server administration and give access to NoMachine Server preferences. Changing settings in this panel requires to have administrative privileges on the server host.
Blanking the remote screen and auto lock are server side options that apply when users connect to the physical desktop of the remote host.
They can be both enabled/disabled via the Server Preferences UI in the Security panel, but you need to be an administrator on the server to change these settings.
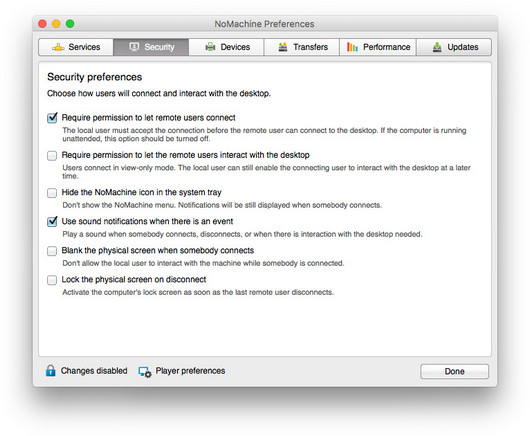
To open the Server preferences GUI, click on the !M icon in the system tray to open the NoMachine Monitor menu and click on 'Show the server status'. Then access the Security panel.
If Blank the physical screen when somebody connects option is selected, when somebody connects to the physical desktop of the server host, only a black screen will be displayed on the physical monitor of such computer. A local user in front of the physical monitor will be not able to interact with the desktop until the NoMachine user logs-out.
The screen blanking feature can be used in conjunction with the automatic lock of the remote screen. Even if the user didn't lock the screen before disconnecting by NoMachine, as soon as the screen is unblanked, the system lock screen will be activated automatically to keep the remote desktop protected even when the computer is running unattended.
Select Lock the physical screen on disconnect in the Security panel of the Server Preferences UI to enable that.
Disabling screen sharing, i.e. disabling access to your local desktop via NoMachine applies only to the physical desktop, either if you are sit in front of the desktop or you are connected from remote.
Open the NoMachine Monitor menu (click on the !M icon in the system tray) of the remote desktop and click on Accepting connections is enabled/disabled to switch on/off access to your desktop.
| TIP |
|
|
|
|
| 'Accepting connections is disabled' lasts until you change it again. It persists also when you are physically logged-out or closed the NoMachine connection.Be very careful when disabling accepting connections from remote, since it will be no longer possible to reconnect to the desktop via NoMachine once the current session is closed. |
NoMachine has full multimonitor support for multiple monitors connected on end-user's side as well as for those connected to the remote server computer.
Multiple monitors connected to your computer
If you have more than one monitor connected to your computer you can display the NoMachine seession window on a single monitor (you can resize the window or send it at fullscreen) or spawn at fullscreen the session windows on all monitors.
To adapt the session window or access the Display settings for tuning quality and resolution, use the small icons (quick access display icons) in the footbar of the NoMachine menu panel.
| TIP |
|
|
|
|
| Move the cursor over the quick icon in the footbar to show its label and see what it does. |
Multiple monitors connected to the remote computer
When the remote computer has multiple monitors, you can switch through those monitors by using shortcuts:
Ctrl+Alt+I to identify the monitor.
Ctrl + Alt + MonitorID to change the current monitor.
Ctrl + Alt + A to view all monitors.
Default shortcuts can be personalized in client UI Settings -> Input panel by clicking the 'Shortcuts' button.
It's possible to switch monitor also from the NoMachine menu by using the quick access display icons in the footer of the menu.
Select the monitor you wish or view all the monitors in one window.
You can find at: https://www.nomachine.com/all-documents a detailed guide to preconfigure client sessions (section 'Configuration') and Tutorials dealing specifically with the administrations of multi-host environments via UI (section 'Tutorials').
Client configuration file (player.cfg) and connection files (*.nxs) are not intended to be edited manually, they are created automatically by the client according to options set via the GUI.
In some cases, however, administrators may need to facilitate their users and avoid that they have to define specific settings by themseleves. Administrators can tune settings in player.cfg and pre-configure the connection file according to their needs. Such files can then be distributed to users.
The client UI permits to set-up and manage a multi-host infrastructure, with the possibility to add, edit and remove hosts at any moment.
To do that, connect to the Cloud Server as 'NoMachine administrator' and click on the 'New server' button to federate a server. If the Cloud Server is on Windows, you can also log-in as Windows administrator, or as 'root' if the host is Mac or Linux:
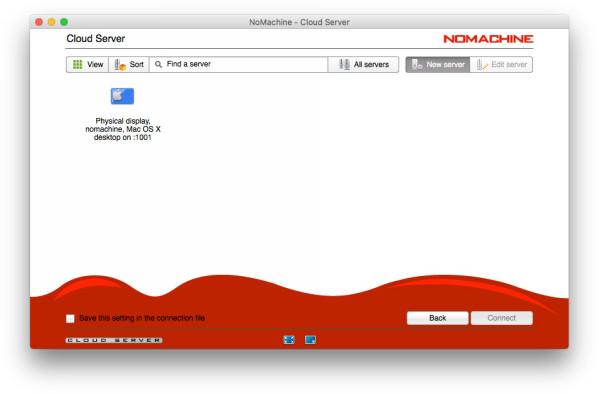
A NoMachine administrator is a system account on the Cloud Server (CS) host having special rights to create NoMachine multi-host environments via UI. To assign such privileges to a system user, execute on the CS host:
| nxserver --useredit USERNAME --administrator yes |
When users connect to a multi-server environment, depending on the Cloud Server configuration, they will be provided with the list of all servers and will be able to choose any of them manually, or they will be automatically directed to the assigned server.
The Cloud Server permits to create multi-level environments, switching the UI 'All servers/Child servers' button permits to list and navigate the whole hierarchical structure or display only those servers added directly to the main CS (children, i.e. first-level servers).
Any federated server by default accepts connections to its IP/hostname. To force users connecting only through the Cloud Server, it's possible to disable direct connections to the federated server.
Most of the time, default settings for forwarding the client connection to the federated server are enough. If specific settings are necessary, it's possible to configure the forward method to be applied and how clients will authenticate to the federated server.
NoMachine Enterprise Terminal Server (ETS) permits to setup a single-tier multinode environment made of Terminal Server Nodes (TSN). Also in this case NoMachine administrators can add the nodes via GUI. Connect to the Enterprise Terminal Server as NoMachine administrator: click on the 'New node' button to add the Terminal Server Node:
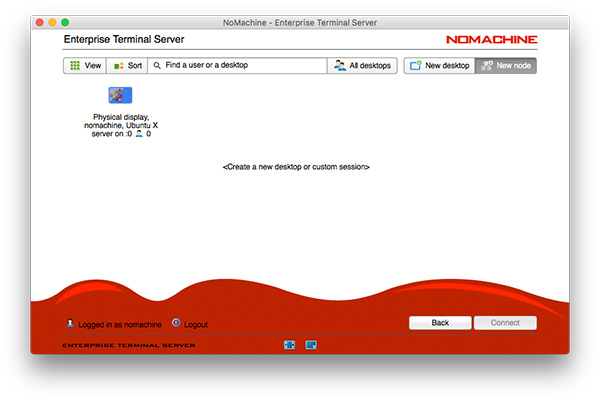
ETS is the single point of access to the multi-node system: a Terminal Server Node cannot accept direct connections to its IP/hostname and no further configurations are necessary.
Depending on the ETS configuration, users' sessions will be automatically load-balanced among the nodes (default) and/or users will choose the node where to start the session.
|


